Setting up a WordPress staging environment is straightforward. Using it properly is where the complexity lives. Most guides focus entirely on the mechanics of setup and leave you to figure out the hard parts on your own.
This guide covers the setup, but it also covers what the tutorials skip: the real trade-offs between methods, the limitations you'll encounter in practice, and the decisions that matter more than which button you click.
If you're not sure what staging is or why it matters, start with our guide on what a staging site is before diving into setup.
Not Everything Needs Staging
Before diving into setup methods, it's worth addressing something most staging guides never say: not every site needs a dedicated staging environment for every change.
If your site runs common, well-maintained plugins and your updates occur weekly, automated staging-based testing handles everything without you touching a staging site. Staging becomes important for PHP upgrades, complex sites with custom integrations, or actual development work. Setting up staging isn't hard. Knowing when you need it and when you don't is a more valuable decision.
For the roughly 200 sites we manage, the vast majority never need manual staging intervention. Automated weekly testing handles routine updates. We create staging manually for PHP upgrades, custom development, and major changes. That distinction shapes which setup approach matters for your situation.
Three Ways to Complete Your WordPress Staging Setup
There are three primary approaches to creating a WordPress staging environment, each with different trade-offs in terms of simplicity, cost, and capability.
- Host-provided staging (simplest, most common)
- Plugin-based staging (works on any host)
- Manual staging (maximum control, most effort)
Which WordPress staging setup method is right depends on your hosting environment, your technical capabilities, and what you need staging for.
Method 1: Host-Provided Staging
If your WordPress site is on a managed hosting platform like WP Engine, Kinsta, Cloudways, or SiteGround (GrowBig plan or above), staging is likely built into your hosting dashboard. This is the simplest path from "I need to test something" to "staging is ready."
How It Works
The hosting platform creates a complete copy of your site on a staging URL. You make changes to the copy, verify everything works, and push those changes to production through the hosting dashboard. The hosting company handles the infrastructure, URL rewriting, and deployment mechanics.
The setup mechanics are straightforward, usually a single button click in your hosting dashboard, followed by a few minutes of copying. Every managed host's documentation walks through the specific steps.
What the documentation doesn't cover is the decision-making that matters more than the button clicks.
Host-Specific Highlights
Cloudways (our hosting partner): Launch a staging application from Server management. Supports both overwrite and incremental sync when pushing changes. Incremental push only copies changed files, so files deleted in staging are not deleted in production. Staging is included on all plans at no additional cost.
WP Engine: Provides three environments on all plans: Development, Staging, and Production. Supports selective deployment: choose files only, database only, or both. Offers table-level database selection when pushing. Git integration is available for code-based deployments.
Kinsta: Free staging on all plans with a Premium Staging add-on for additional environments with production-level resources. Selective Push lets you choose specific files and folders, not just "all files." Bidirectional push between staging and production.
SiteGround: Available on GrowBig and GoGeek plans. Not available on the cheapest StartUp plan. Offers both full deploy and custom deploy (selective based on added, updated, or deleted content). Does not support WordPress Multisite.
Host-Provided Staging: Honest Assessment
Strengths:
- Zero setup overhead. One click, and your staging environment is created.
- Environmental parity with production. Same PHP version, same server configuration, same caching.
- No additional plugin footprint on your site.
- Usually included in your hosting cost.
- Fastest path from needing staging to having staging.
Limitations:
- The database merge problem still applies. Most hosts offer a button to push staging to live, but it's a full overwrite rather than a selective merge.
- Limited customization of staging behavior. You get what the host provides.
- Some hosts share resources between staging and production, meaning a heavy staging process can slow down your live site.
- Staging retention and storage limits vary by host.
How we set up staging across 200 sites: We use Cloudways as our hosting provider, and staging is enabled by default on every site. For weekly updates, our automated system (SafeUpdates) handles staging creation, testing, and deployment without manual setup.
For custom development and PHP upgrades, we manually create staging environments in the Cloudways dashboard. The setup takes minutes. The testing and workflow discipline takes years to get right.
This is how we manage staging for clients ranging from Merrick Creative's portfolio of 50 sites (where staging environments are provisioned on demand for any site in the portfolio) to the National Peace Corps Association's 50-site network (where a standardized plugin stack across all affiliates means staging-tested updates roll out consistently).
Our take: For most organizations, host-provided staging is the right choice. It's the simplest, most reliable option, and it keeps staging management in the same place you manage everything else about your hosting. The key is understanding that "one-click staging" is a one-click setup, not a one-click workflow. The testing and verification process that happens after setup is what actually matters.
Method 2: Create WordPress Staging with a Plugin
If your hosting provider doesn't offer built-in staging, or if you need capabilities your host's staging doesn't provide, staging plugins create staging environments directly from your WordPress dashboard.
How It Works
A WordPress plugin creates a copy of your site, typically in a subdirectory (e.g., yoursite.com/staging) or on a subdomain. Some plugins host the staging copy on their own cloud infrastructure rather than on your server. The setup process is handled within WordPress admin, and each plugin's documentation covers the specific steps.
The Real Decision: Plugin vs. Better Hosting
Before setting up a staging plugin, ask whether it solves the right problem. If your hosting doesn't offer staging and you're adding a plugin to fill that gap, it may be worth evaluating whether the hosting itself is the issue. Plugin-based staging adds a layer of complexity and server resource consumption that infrastructure-level staging avoids entirely. For a detailed comparison of the available plugins, see our WordPress staging plugins guide.
Plugin-Based Staging: Honest Assessment
Strengths:
- Works on any hosting provider, including budget shared hosting
- Often provides more granular control than host-provided staging
- Some plugins (WP Stagecoach) offer database merge capabilities
- Lower cost entry point with free tiers available
- Doesn't require access to your hosting dashboard
Limitations:
- The staging site runs on the same server as your production site. Heavy staging operations consume server resources that your live site needs.
- Push-to-live reliability varies significantly between plugins. This is a critical function being handled by a WordPress plugin, not server-level infrastructure.
- Potential conflicts with caching, security, and optimization plugins.
- Free versions of most staging plugins can create a staging site, but can't push changes back to production. That capability requires a paid upgrade.
- More complexity than host-provided staging for a task that should be simple.
Our take: Plugin-based staging is the right solution when your hosting doesn't offer staging and switching hosts isn't an option. For sites on managed hosting with built-in staging, a staging plugin adds unnecessary complexity to your WordPress staging setup. For a detailed comparison of specific staging plugins, see our WordPress staging plugins guide.
Method 3: Manual Staging
Manual staging means creating a copy of your site yourself: exporting the database, copying files to a staging location, updating the configuration, and handling URL replacement. This is the developer's approach.
How It Works
You create a subdomain (e.g., staging.example.com), copy your WordPress files and database to that location, update the configuration to point to the new database, and run a search-replace operation to update URLs throughout the database. The process involves database exports, file transfers, configuration changes, and URL replacement, each of which requires command-line skills and a solid understanding of WordPress internals.
We're not going to walk through the bash commands here. Every hosting environment handles this differently, and if you're at the skill level where manual staging is appropriate, you're already familiar with wp db export, rsync, and wp search-replace.
If those commands don't mean anything to you, manual staging isn't the right approach for your situation, and that's fine. Most organizations should avoid it entirely.
Manual Staging: Honest Assessment
Strengths:
- Total control over every step of the process
- No dependency on plugins or hosting features
- Works in any environment, on any host
- Deepest understanding of what's happening at each stage
- Can be scripted and automated for repeated use
Limitations:
- Time-intensive and error-prone, especially the search-replace step
- Requires strong technical skills (command line, database management, DNS configuration)
- No built-in mechanism for pushing changes back to production
- Human error in the search-replace operation can break sites (particularly with serialized data)
- Impractical for frequent use
Our take: Manual staging is the emergency fallback or the one-time setup for environments where no other option exists. It's not a practical workflow for regular maintenance. If you're doing this regularly, invest in hosting that includes staging or use a plugin that handles the mechanics reliably.
The PHP Version Bump: A Different Kind of Setup
One staging setup pattern that no standard tutorial covers: using staging as a PHP migration path.
When PHP releases a new version, we don't upgrade PHP in place on a running production server. Instead, we stage the site on a new server running the newer PHP version, do all testing there, and then redirect traffic to the new instance.
The staging site becomes production. The old server stays running as the fallback until we're confident everything is stable.
This approach eliminates the risk that a PHP upgrade will break a production site. If the new PHP version reveals incompatibilities, the original production server is still running, untouched, on the original PHP version. This is a setup pattern that requires hosting infrastructure capable of running parallel server instances, which is one more reason why the hosting choice matters more than the staging tool choice.
Method 4: Local Development Environments
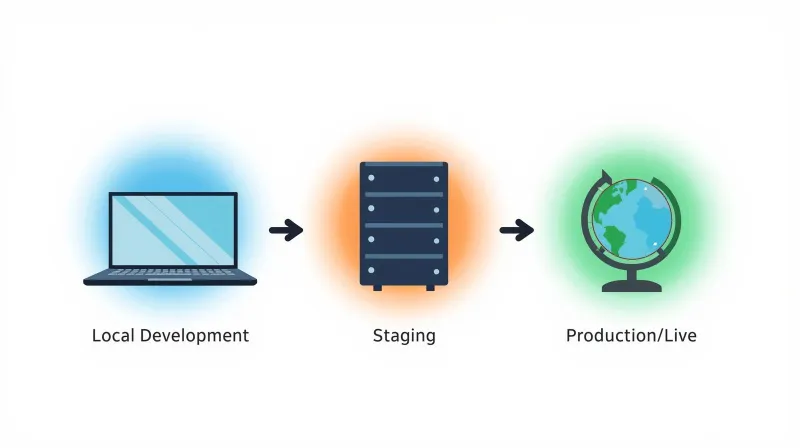
Local development isn't staging in the traditional sense, but it's part of the same workflow. Every developer has what we call a "local," a WordPress installation running on their own machine for development and testing. We never develop on production, never test plugins on a live site. The local environment is stage zero.
Local Development Tools We've Worked With
Local (by Flywheel/WP Engine): The easiest entry point. GUI-based with one-click WordPress setup, custom PHP version selection, and built-in SSL. Free for all users. This is what we'd recommend for anyone who needs to test something locally but doesn't live on the command line.
DDEV: Docker-based, open-source, and our preference for custom development work. Strong PHP ecosystem support with good performance. Configured via YAML files, which means setup is repeatable and version-controlled. Best for developers who are comfortable with the command line and want consistency across projects.
Lando: Docker-based with flexible configuration. Supports many frameworks beyond WordPress. Powerful but with a steeper learning curve. We've seen teams use it effectively, but the configuration overhead is higher than DDEV for WordPress-specific work.
DevKinsta: Built by Kinsta with direct integration for push/pull between local and hosted environments. If you're already on Kinsta, this is the path of least resistance.
Where Local Fits in the Workflow
Local development is the step before staging. Developers build features and fix bugs locally, then deploy to staging for testing and client review, then deploy to production after verification.
Local environments are excellent for development work, but aren't suitable for client previews or stakeholder reviews. They run on the developer's machine and aren't accessible to anyone else without additional networking setup.
Choosing the Right Method
| Factor | Host-Provided | Plugin-Based | Manual | Local Dev |
|---|---|---|---|---|
| Setup complexity | Low | Low-Medium | High | Medium |
| Ongoing effort | Low | Low | High | Low |
| Server resource impact | Varies | High | None | None |
| Environment parity | High | Medium | High | Low-Medium |
| Push-to-live capability | Built-in | Paid plugins | Manual | Manual |
| Best for | Most sites | Budget hosting | Emergencies | Development |
For most organizations: use host-provided staging. It's the simplest, most reliable, and most maintainable approach.
For sites on shared hosting without staging features: use a plugin like WP Staging or BlogVault.
For development teams: use local development for building, host-provided staging for testing and review.
For everyone: regardless of which method you use to set up a WordPress staging site, the setup is the easy part. The testing workflow, database handling, and post-deployment verification are what determine whether staging actually protects your site.
What Comes After Your WordPress Staging Environment Setup
Completing the WordPress staging environment setup is the first step. Here's what needs to happen next:
Block search engines. Verify that your staging site has noindex directives, restricted access, or both. A staging site indexed by Google creates duplicate content, which can damage your production site's rankings.
Establish your workflow. Document how staging will be used: who creates it, what gets tested, how changes are pushed to production, and how the staging environment gets cleaned up afterward.
Understand the database. Before you push anything from staging to production, understand the database merge problem. Push files forward. Leave the production database alone unless you have a specific, deliberate reason to touch it.
Cleanup plan. Staging sites should be temporary. Create them, use them, destroy them. Persistent staging sites drift from production and create more problems than they solve.
Consider automation. If you're managing updates regularly, manual staging creation and testing don't scale. Automated staging-based update testing handles the weekly update cycle without human intervention, escalating to manual review only when something fails.
Plan your deployment strategy. Understanding how to push staging to production safely is just as important as the setup itself. The push strategy you choose (files only, selective database, or full push) determines the risk level of every deployment.
For organizations that need staging handled professionally without having to think about any of this, that's exactly what managed WordPress maintenance provides. Staging is built into every maintenance cycle for every site we manage.
Want Staging Without the Setup Headaches?
If managing staging environments sounds like more than your team wants to take on, that's a reasonable conclusion. Learn about our WordPress maintenance services, where staging is built into every update, every deployment, and every maintenance cycle.